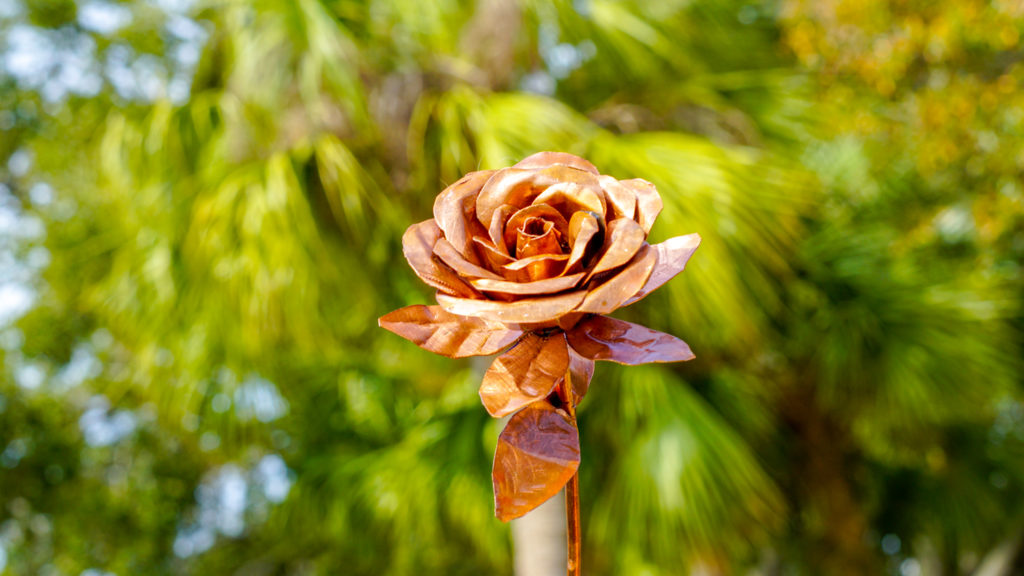
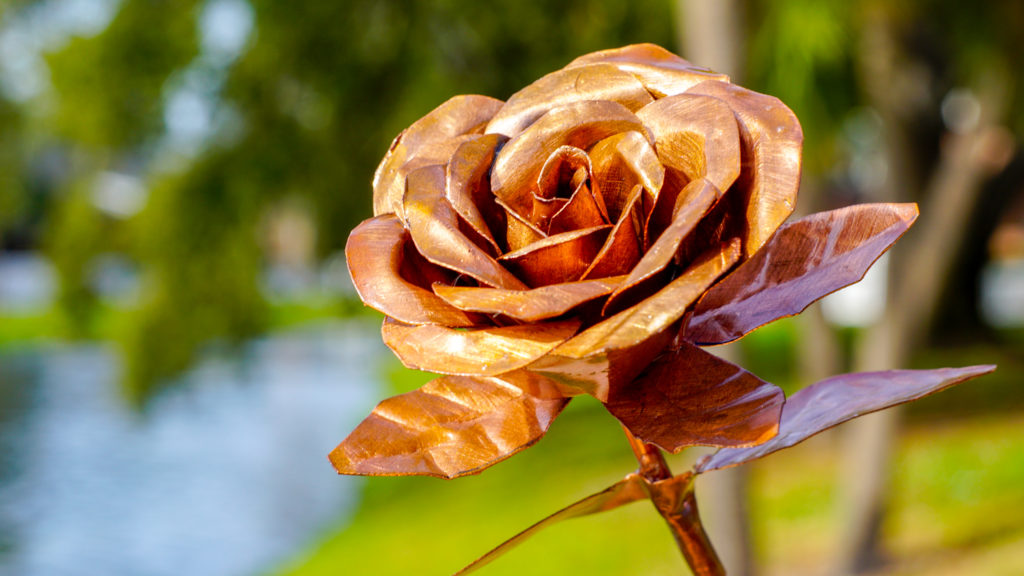
Giving gifts is tricky with all the expectations involved. Giving Valentine’s Gifts is especially tricky. This year declare your love eternal with a Handmade Copper Rose. This one-of-a-kind gift will be completely unique based on your customization and is a shiny symbol of your unwilting and calorie-free relationship.
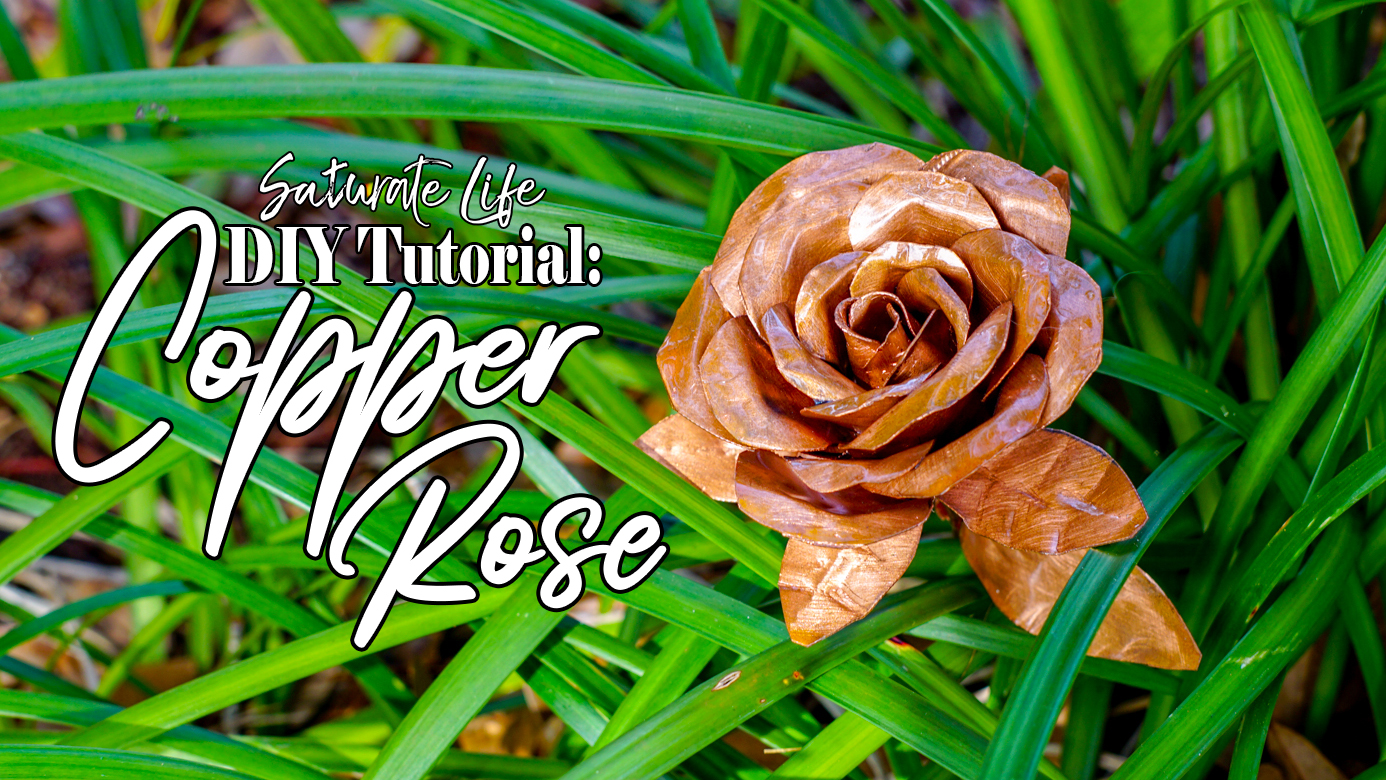
Copper Rose: An Advanced DIY
DIYing this Copper Rose is a slightly advanced DIY. If you have a decent toolkit at your or your dad’s, or neighbor’s disposal, the price in
Materials and Tools for Making a Copper Rose
Approx Time: 3-4 Hours Active Work. 36-72 hrs waiting for stuff to dry.
Materials
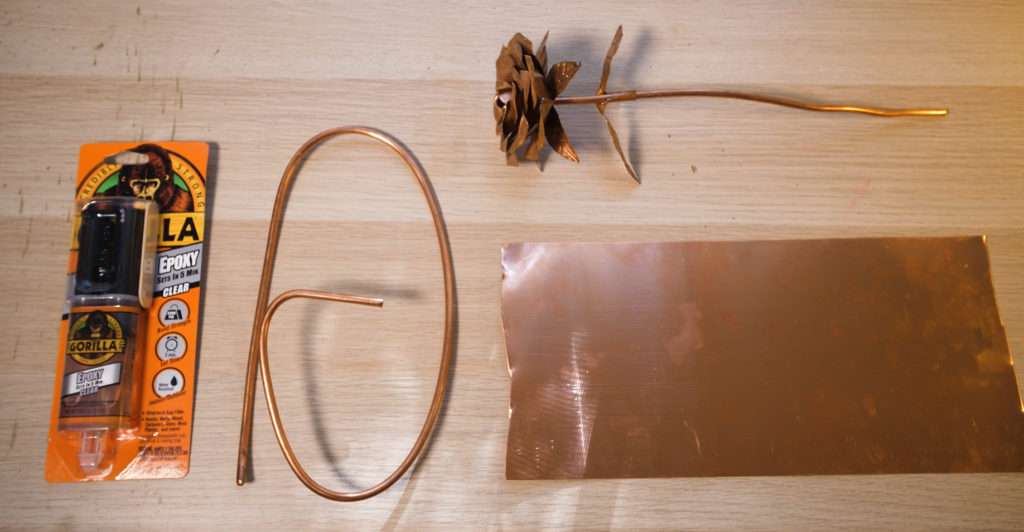
- Copper Coil Flashing (If you are in the Midwest Menards has it for really inexpensive.)
- Copper Wire
Two Part Epoxy- Polyurethane Spray (Optional-recommended)
Tools

- Compass/ Various sized circular objects
- Tin Snips – Left and Right
- Two Needle Nose Pliers
- Fine Grit Sandpaper
- Drill+ Drill Bit the same diameter as the copper wire
- Hammer
- Mason’s Chisel (For detailing)
- Vice Grips
Copper Rose Video Guide:
Some prefer to read, some prefer to watch. I collaborated with the fabulous
Copper Rose Written Instructions:
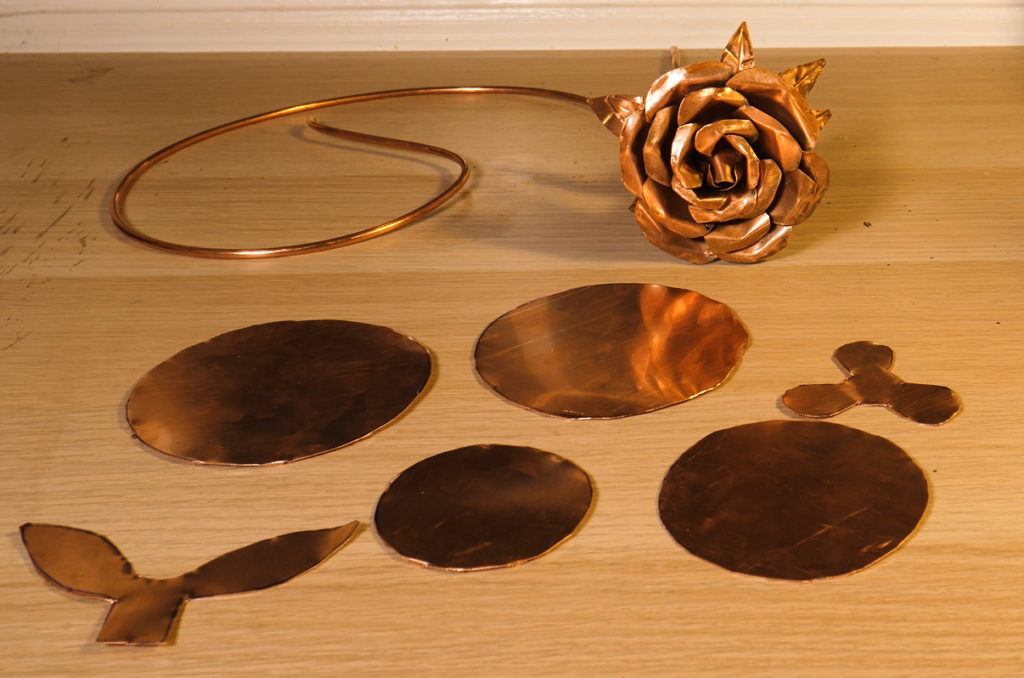
The Circular Copper Rose Petals and Leaves
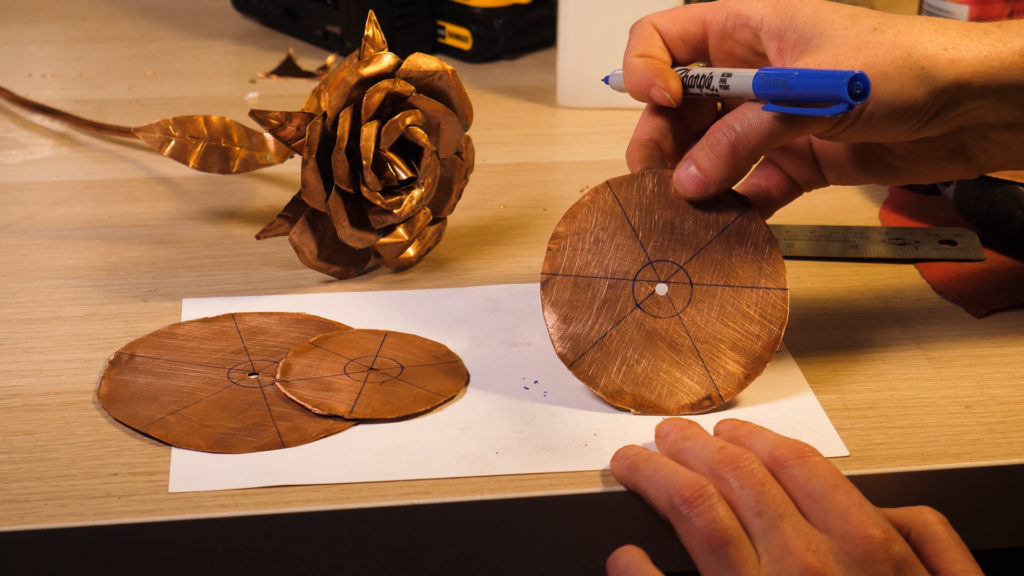
The first step to take when creating your copper rose is to decide how big this thing will be. You can use a compass if you are the type for precision but I’m not sure where my compass is. So I’m using soup cans. My soup cans are 2 1/2″, 3″, and 4 1/4″ in diameter.
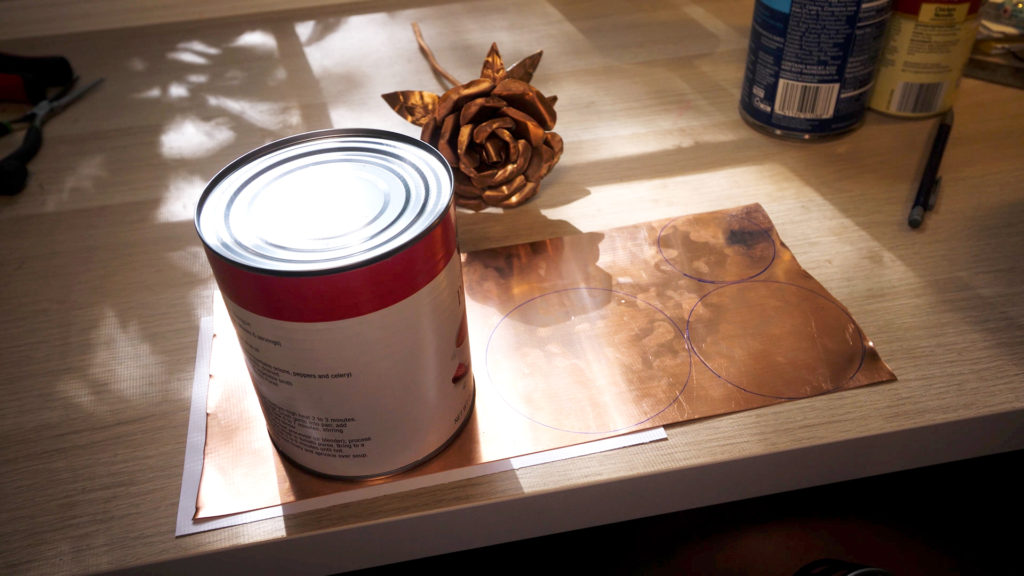
You can also use drinking glasses, coffee canisters, whatever will give you some different sized circles. While you shouldn’t have a huge difference in sizes (like 2″ to 6″ hike) this isn’t rocket science so the numbers can vary somewhat or not be in a perfect ratio.
You will need a total of 4 circles. 3 Different sized diameters for your petals and one more of the largest or second largest for the accent leaves under your rose.
Inner Petals and Stem Leaves
The inner petals are a little bit more tricky than just a circle. They’re this kind of propeller shape or a fidget spinner (Note: at the writing of this post fidget spinners are already uncool).
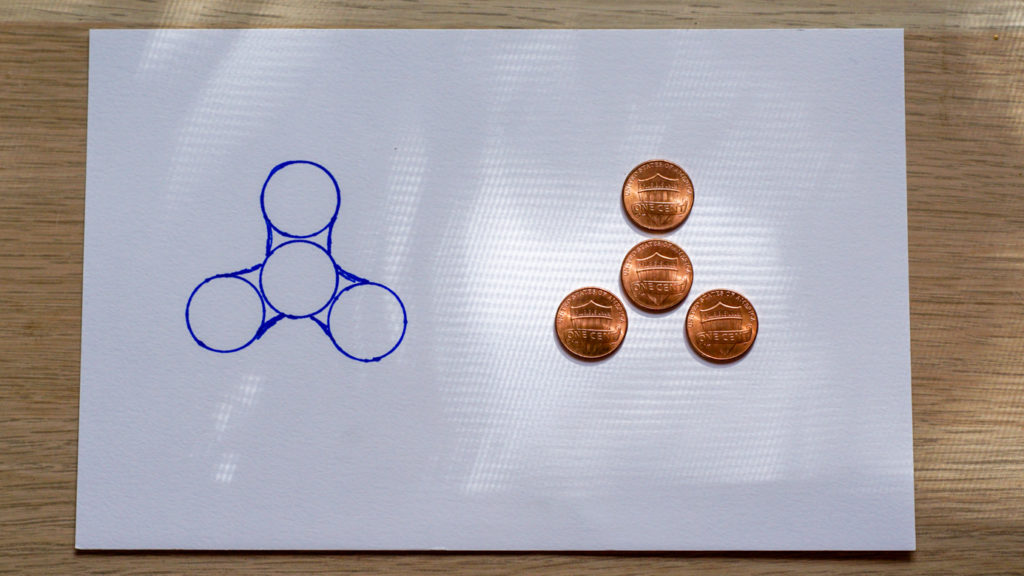
I used a penny to give me a size ratio for the inner petals. First I traced the penny for the center and then traced it again about 1/8″ away from that central circle. I repeated this two more times equally spaced around it for a total of 3 lobes.
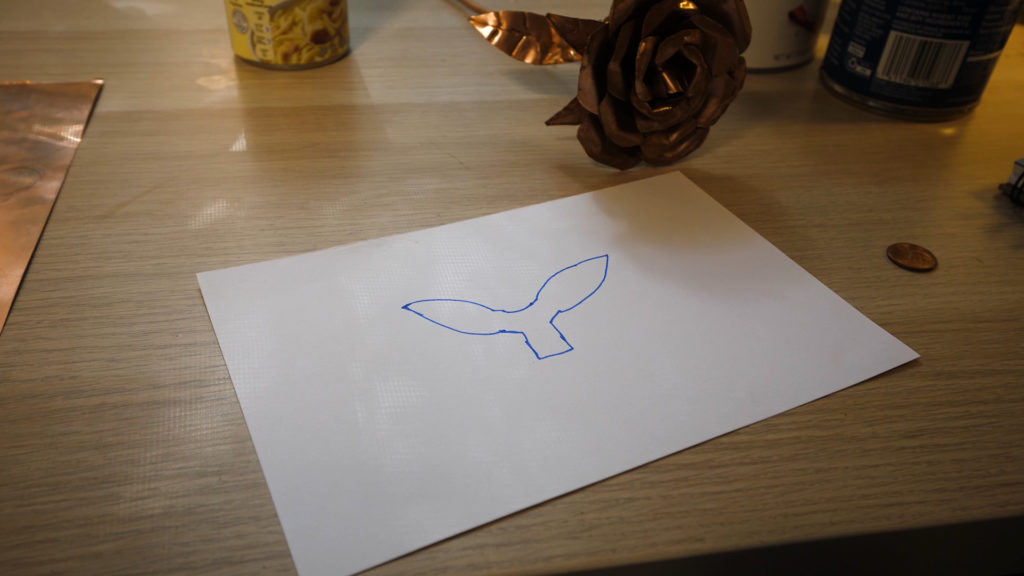
For the stem leaves I freehanded it, however, you can use your compass or soup cans to create the perfect arc. The first thing to draw is the portion that will wrap around the stem. It is slightly more narrow than a penny. From there branch off at a 45° angle and draw the arcs for your leaves. Connect the two leaves with a concave arc over the original part that will wrap around the stem. I feel like I’m butchering the description of this, so it might be best to look at the photo.
The Worst Part of making The Copper Rose
This will be the part that will prevent you from going out and making a dozen of these beautiful Copper Roses. For the next
If you have gloves they will be a big help, the metal will have
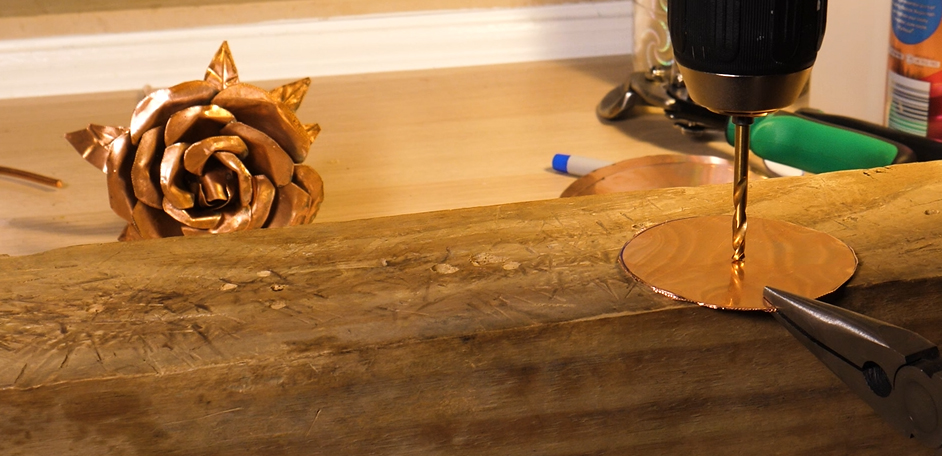
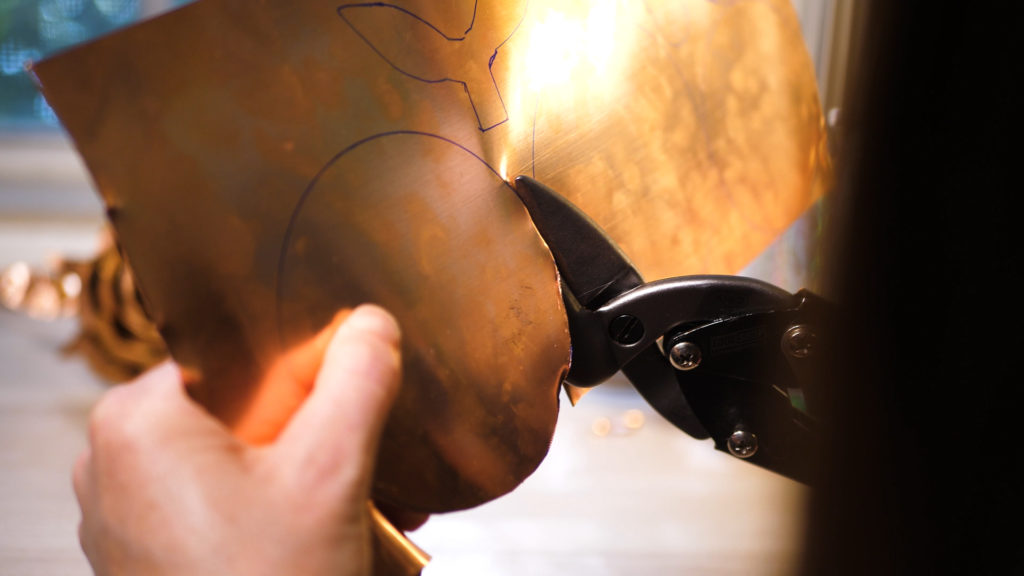
After cutting out all the shapes, Drill a hole the size of the stem of your Copper Rose in the center of each circle and the central propeller (do not drill a hole in the stem leaves). You will need to hold the disks with some pliers so they don’t become rotating blades of jagged metal and doom.
Annealing the Copper for the Copper Rose
I love this part of making the copper rose because it’s beautiful and
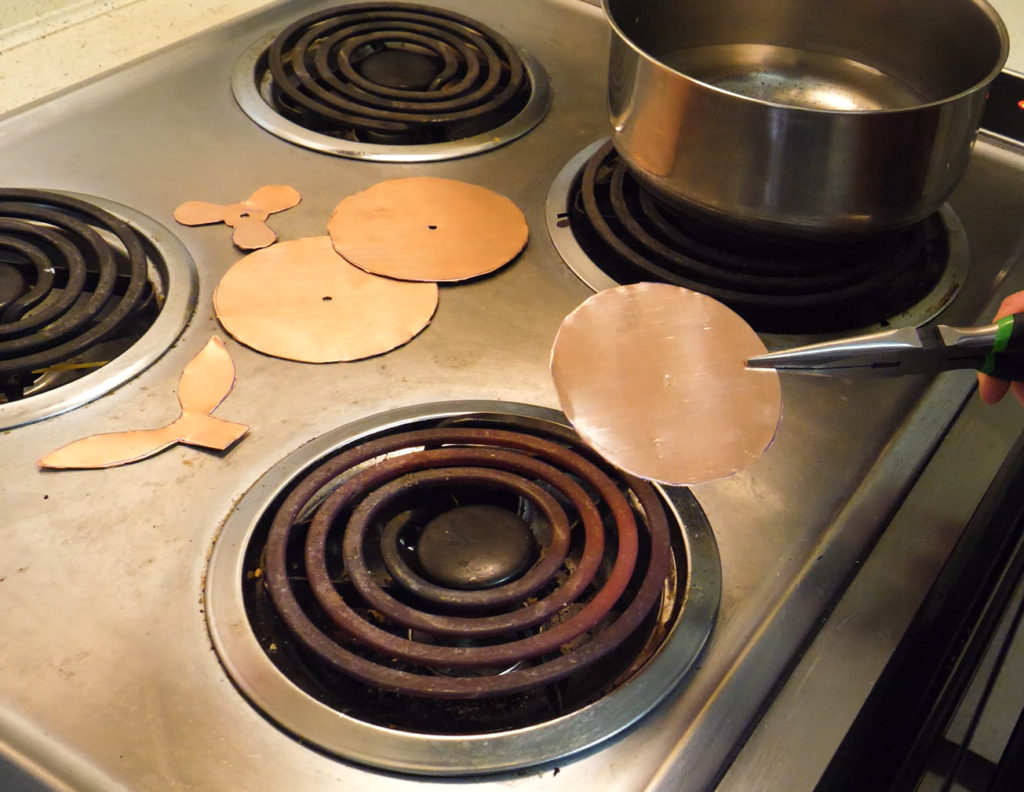
First and foremost prepare a bowl of water to cool down your copper. You can heat the copper over your stove, a blow torch, flame thrower, burning passion of your love, whatever you have on hand. I set my electric stove to high and set the copper directly on the red hot coils. Then you wait for the beautiful show that occurs as the chemical reaction takes place.
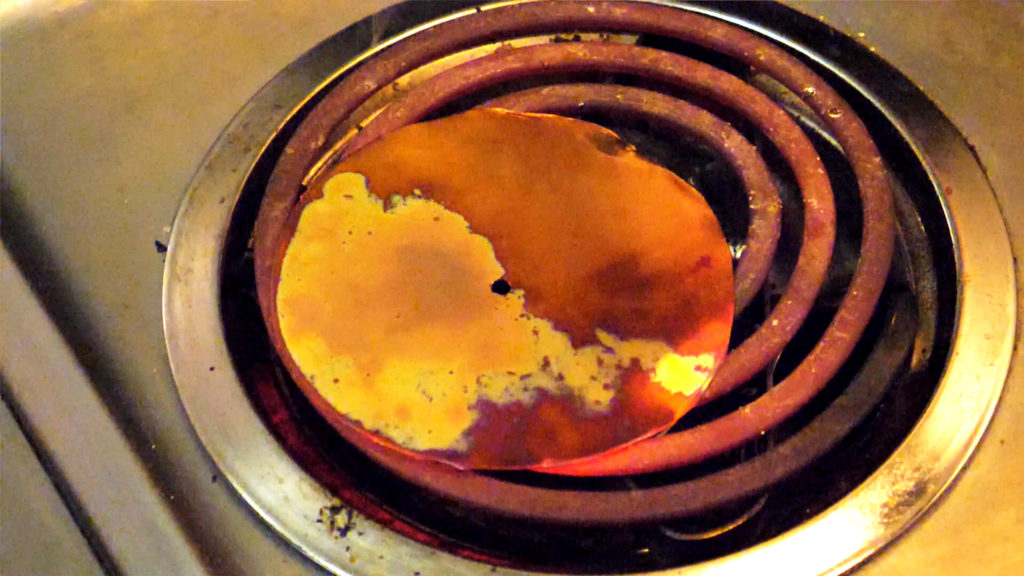
Once that is over and the copper has dulled to black pick up the piece with your pliers and put it in the bowl of water. In a sharp hiss, the copper will cool dramatically and most of the black will shed into the water.
Segmenting the Petals for the DIY Copper Rose
I next took fine grit sandpaper and sanded the discs to bring back the shine to the copper. When it’s to your liking here we segment the petals. Take a penny and trace it over the center of each disk and the hole we previously drilled.
With a straight-edge segment the three disks destined to be petals into six segments. You will take your tin snips and cut the circles only until the outline of the penny. So then you aren’t cutting completely through. Since annealing, the cutting shouldn’t be so bad.
Round the edges of each petal to your desire. I suggest consistently doing only one side of each petal with your dominant hand, then flipping the whole disk over to finish out the other side.
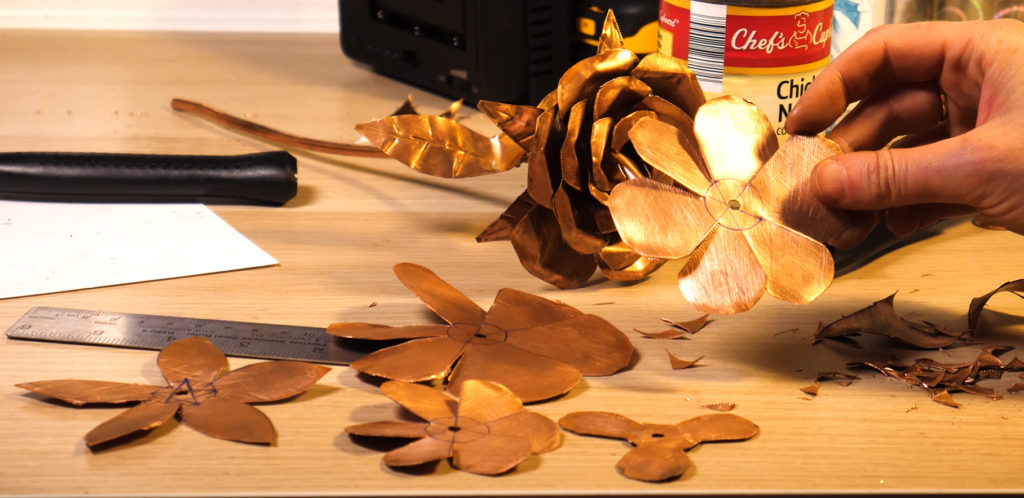
The Leaves of the Copper Rose
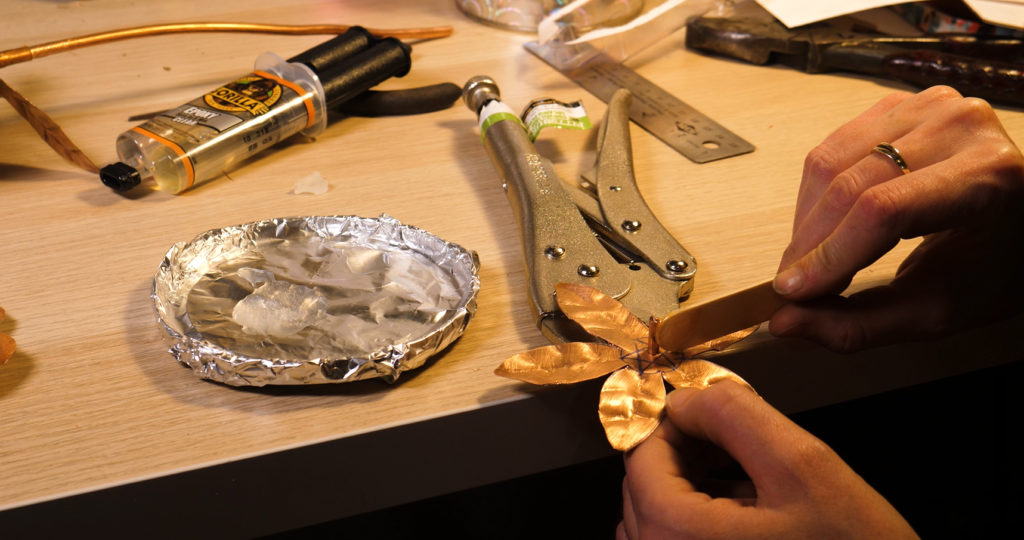
The last disk is for the decorative leaves on the Copper Rose. There will be five leaves. Once again, Trace the penny around the central pre-drilled hole. I found the best way is to think of each leaf like the points of a star.

There’s the large star on the outer corners and a smaller star inside of the traced penny. Take your soup can, compass, or even freehand it and connect the middle point of the inner star with the actual point of the exterior star with a convex arc. Continue this until you have five leaves and cut those out as well.
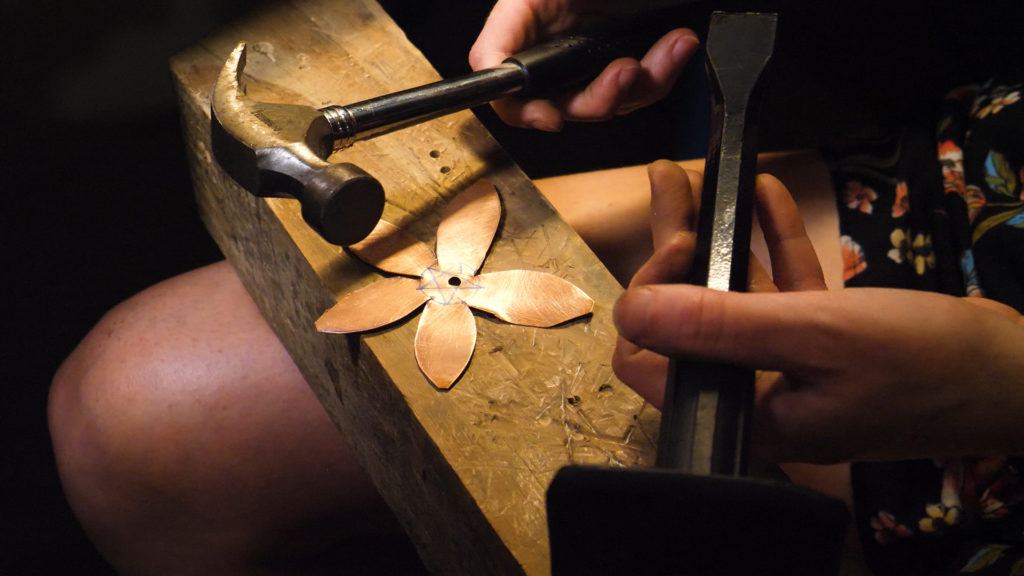
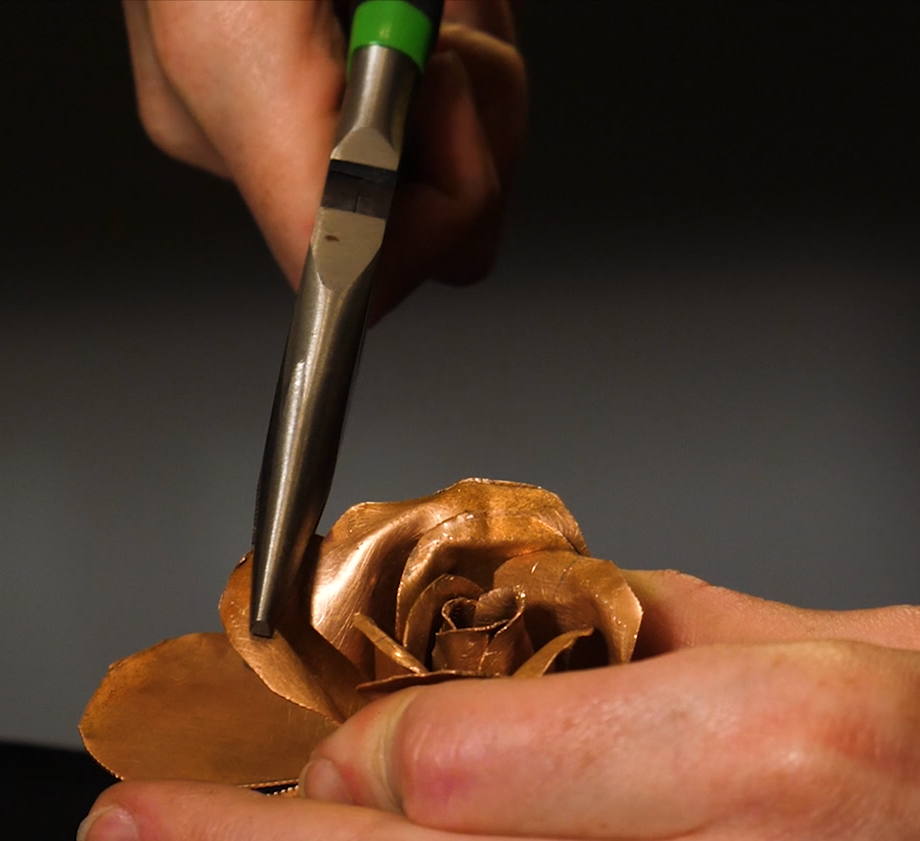
At this point you hammer out the veins of all the leaves (including the stem leaves) with your mason’s chisel. One down the middle of each leaf and a couple of decorative Vs to frame it. If you don’t have a mason’s chisel I also quite like the effect of just hammering on the metal to give it texture.
Gluing The Copper Rose
Cut the copper wire to the length you would like for the stem. When all the petals and leaves have been cut out take a moment to dry fit them onto your stem, they should slide on without much effort. If it takes effort try to make the hole a smidge larger.
Smash the petals and leaves down to make sure that they are once again flat and mix your two-part epoxy. It won’t be an excessive amount,
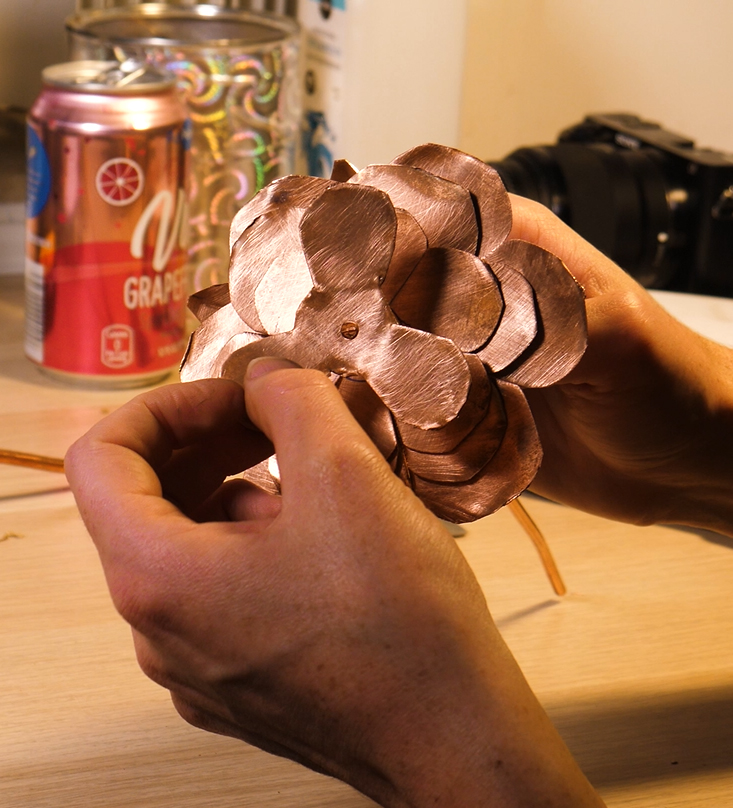
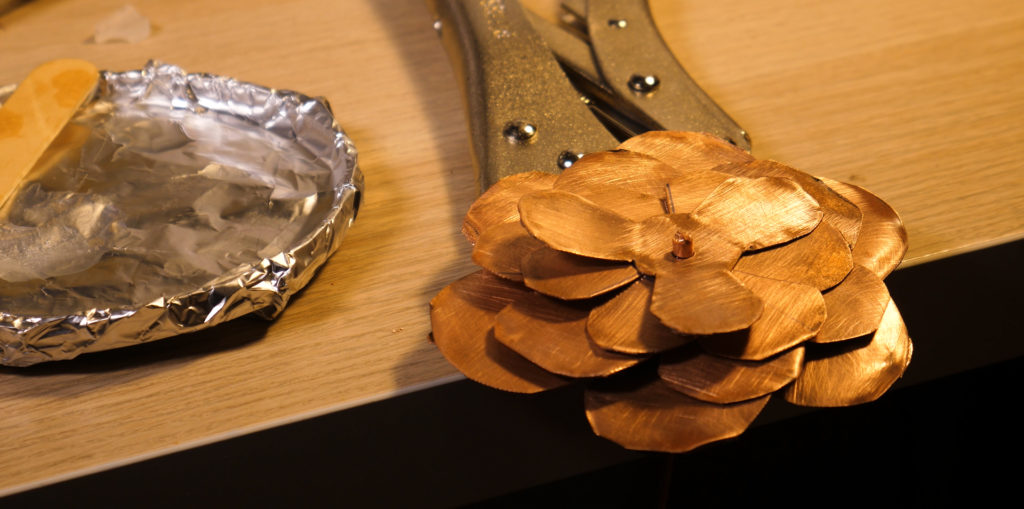
The layering order of the petals and leaves is as follows from the first one placed to the last one placed.
- Circular, decorative leaves
- Large circular petals
- Medium circular petals
- Small circular petals
- Fidget Spinner Petals
Make sure to swipe some of the two-part epoxy between each layer on both sides of the stem. It doesn’t take a whole lot of epoxy, the size of a few droplets. Once all the layers are on. Squish them together for a little better connection and put a
You wait for the epoxy to dry for three hours while hanging on the edge of a table (over some paper towels incase the epoxy drips) before removing the vice grips to let it finish drying the full 24 hours. (If you don’t remove the vice grips you risk
Note: You could also solder the petals on if you’re cool like that. But be careful which metal you use because otherwise, the solder will react with the copper hastening the oxidation process.
Bending the Center Petals of the Copper Rose
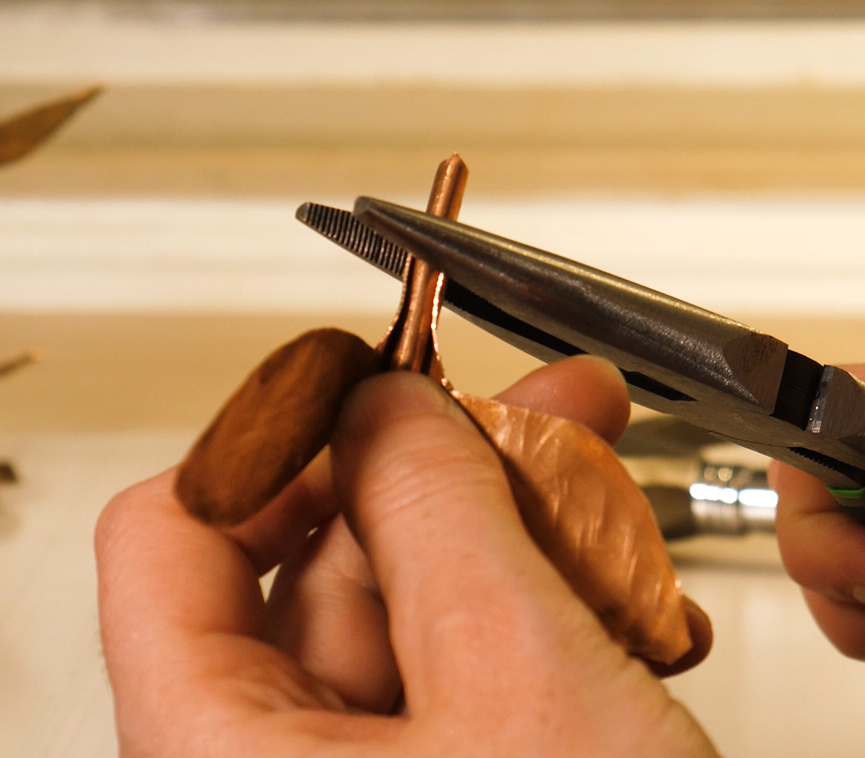
Once the epoxy has dried you can start bending the petals in the copper rose. After cutting out the circles, bending the petals is a cakewalk. At some point you’ll create a system of tools to use. I used tools ranging from my fingers to two pairs of sturdy needle nose pliers but you might use other things.
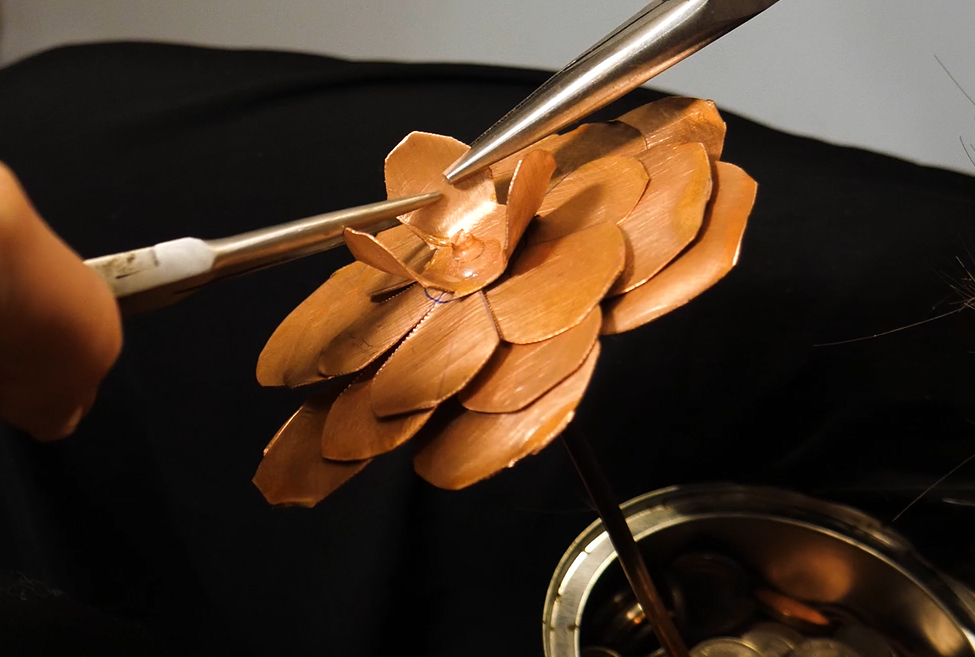
For the center petals I bent them in a V shape with the two outside edges towards the center. I focused on bringing the three center petals into a spiral shape and making them as tight as possible with my hands, pliers, anything that would work in order to cover up the smidge of stem and glue poking out of the top.
Bending the outer petals of the Copper Rose
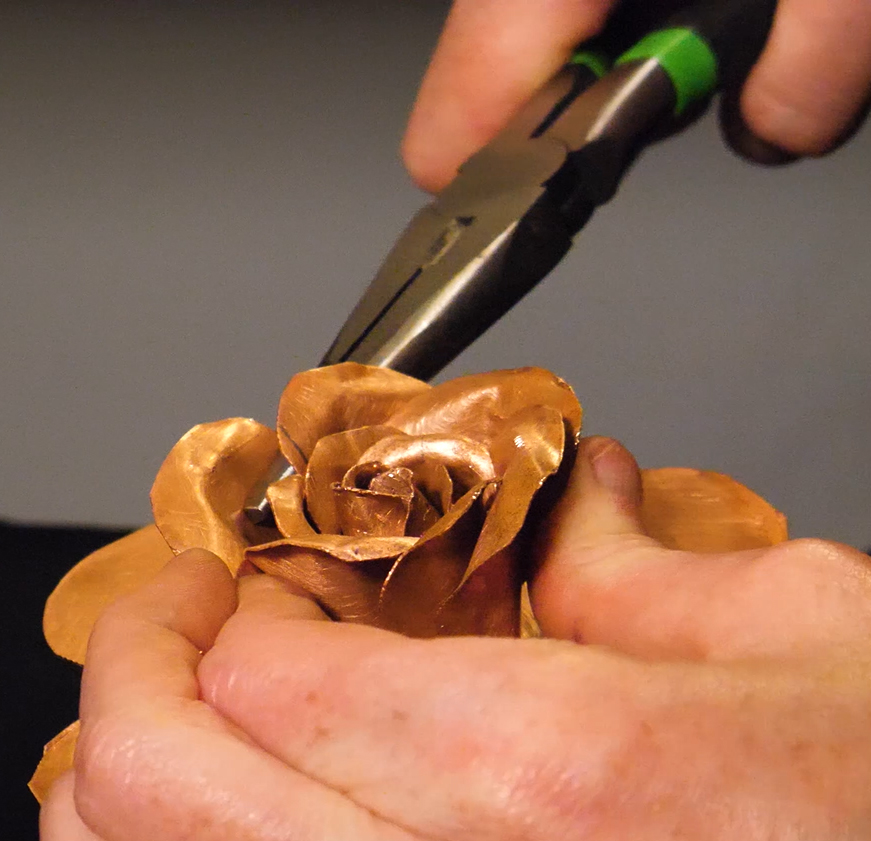
The outer petals of the copper rose start out similar to the center. I use my fingers to bend the petals into a V shape towards the center. This is where it gets a little confusing to type out after bending the petal inward, you then take your needle nose
From here however tight you want your copper rose is up to you. A looser set of petals rose will look closer to one in full bloom, a tighter set of petals will be closer to a bud. Both are phenomenally gorgeous.
Preparing the Stem Leaves of the Copper Rose
For the stem leaves you take your pliers and wrap the bottom dohickey tightly around the stem. From there you swipe some epoxy at the spot you’d like the leaves to set and twirl the sized leaves around to spread the epoxy on all sides of the stem. Tighten the leaves as necessary to keep them in place.
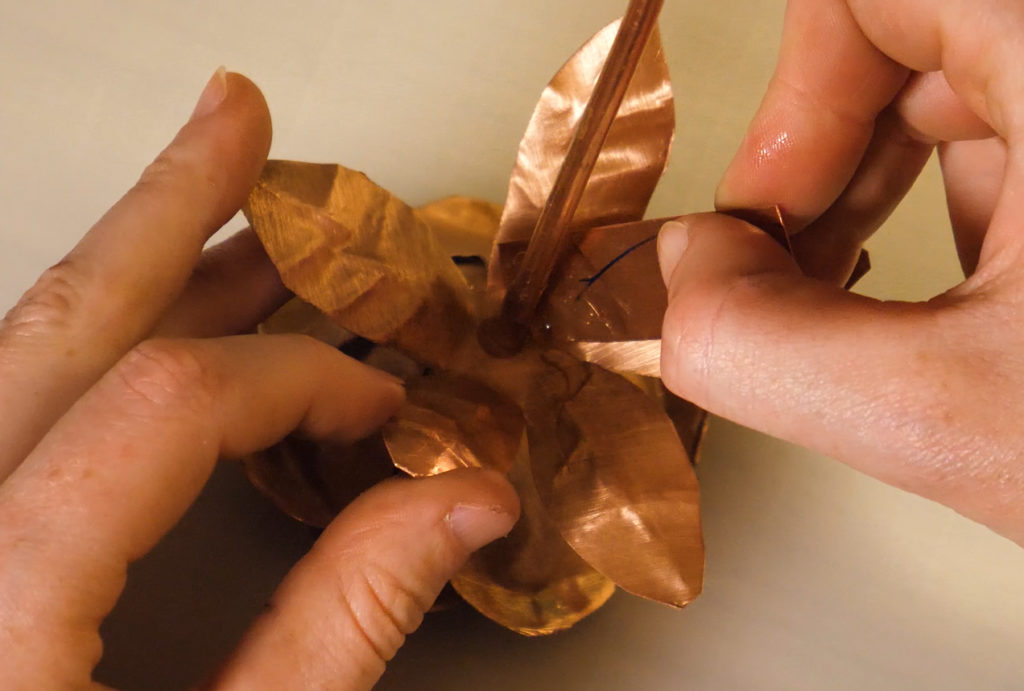
Be sure to also take another dollop of epoxy on the bottom of the rose where the 5 pointed leaves meet the stem to help secure the copper rose in place. Aaaaand you guessed it: More Waiting. I hung my rose again with some vice grips over the edge of my table and some paper towels upside down.
Different ways to Finish off the Copper Rose
Once the epoxy is dry the Rose is finished! Kinda. There are multiple ways to play with the natural properties of the copper. Here are 4 different ways to finish off the Copper Rose:
- Copper Gold Unsealed
- Copper Gold Sealed
- Patina Blue
- Patina Black
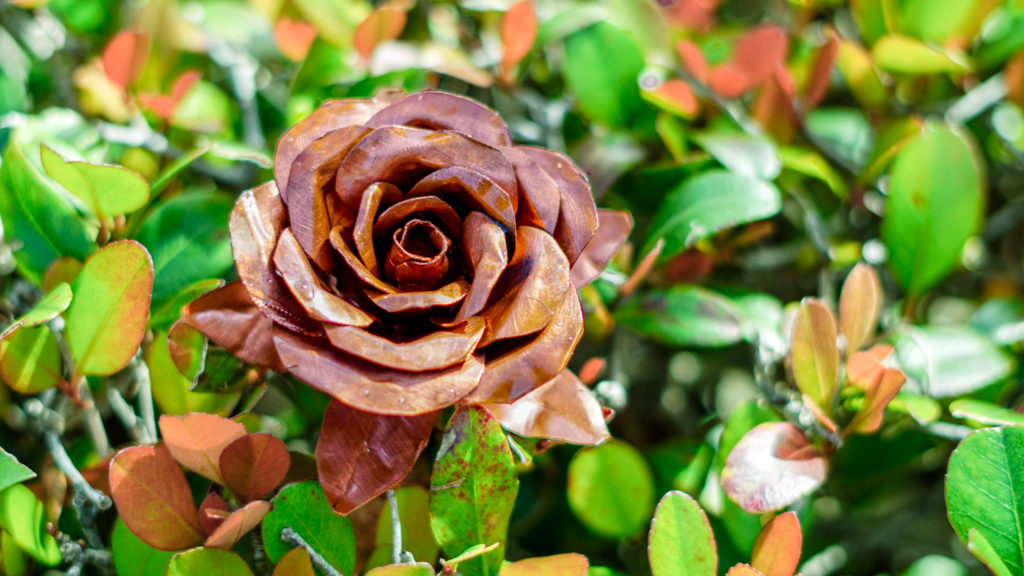
Unsealed Copper Rose
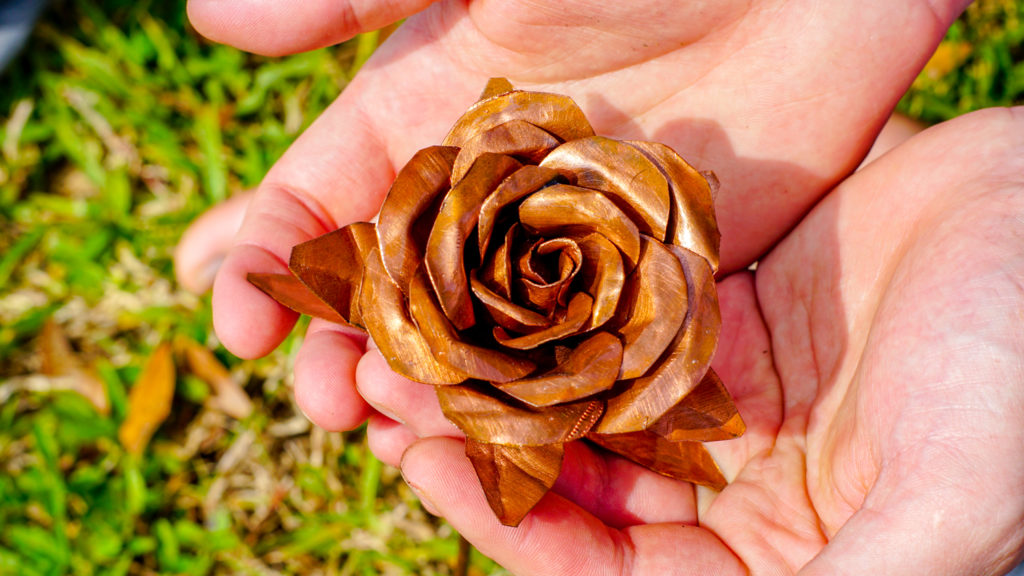
Well, you’re done. The Unsealed Copper Rose is left as is after bending the Petals. It’s a great option to show the length of your love through the natural, gradual changing of the copper as it interacts with the air around it. The copper will act much like a penny and change to a more muted or even green tone like The Statue of Liberty.
Sealed Copper Rose
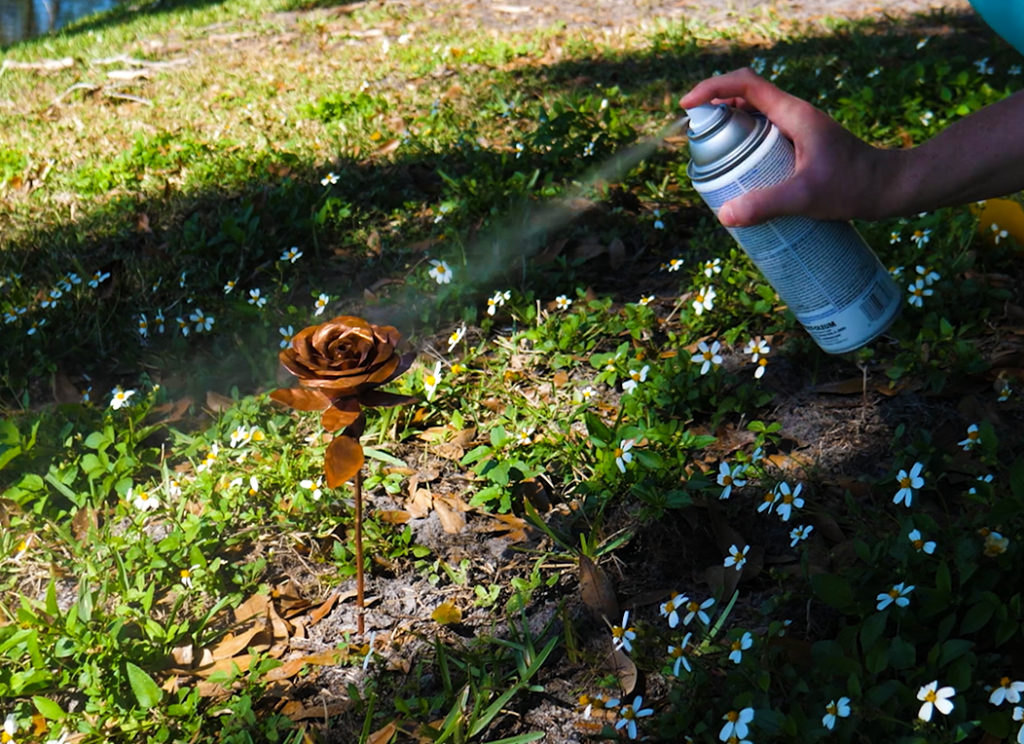
To seal the rose from the changing process as noted above you just need to put a few coats of Polyurethane to keep the air from interacting with the copper. I would recommend a spray. I don’t know how else you’d get into all of those nooks. This will keep the rose the beautiful copper gold it is.
Patina Blue Copper Rose
For this method, you will require a few extra materials. The approximate time for this finish is about 20 min of work and 8-48hrs of waiting around.
If you are a more video watcher there is a wonderful video by April Wilkerson on Youtube to show you the process on flat sheets.
- Mineral Spirits
- Ammonia
- Salt (Table or Sea)
- Spray Bottle
- Fume Chamber (a rose sized plastic container with
lid ) - Polyurethane Spray
Work Outside or in a well-ventilated area! The fumes from the ammonia will be unbearable indoors. Fill a spray bottle with ammonia and prepare your fume chamber. Put some ammonia at the bottom of the chamber and prepare a way for the rose to not actually sit in the ammonia, just bask in the fumes. Sticks, other wires, something to help prop it up.
First clean off the rose from all your dirty finger gunk with some mineral spirits. Just fill a rose bloom sized container with mineral spirits and dip it in a few times
Place the copper rose in the prepared fume chamber. Again, ensure that the rose is not sitting in the liquid ammonia, just existing with the fumes. Put the lid on and go about your day. Come back every 8 hours or so to spritz more ammonia on the copper and to check up on it. Depending on how intense you want the patina to be the process could be between 8 and 48 hours.
When the color is to your liking seal in the copper patina with Polyurethane so the process doesn’t continue further. Enjoy your Speckled Blue Rose.
Patina Black
Some other, different materials! This process is about 10 minutes active and 30 minutes waiting around.
ZJ Creates did a video on how to Patina Copper Roses on youtube here. It’s a bit lengthy, but goes into a decent amount of detail.
- Mineral Spirits
- Warm Vinegar
- Distilled Water
- Liver of Sulfur
- Polyurethane Spray
Prepare your warm vinegar. You will need to be able to keep your vinegar warm, so a crockpot with an extension cord because you will be working in a well-ventilated area or outside this stuff
Put the copper rose in the warm vinegar for around 20 minutes. You want the metal to get warm as well as help clean in all those nooks and crannies. While that is going on prepare another two containers of distilled water large enough to dip the rose bloom/leaves into.
Leave one container of distilled water alone. The second container put a nugget or dollop of Liver of Sulfur into the distilled water and stir to dissolve completely. After 20 minutes is up and the metal is warm flick off the excess vinegar. Rinse the Copper Rose in the distilled water. Stir it around for a minute or so, flick off excess water.
Now magic time: Submerge the Rose into the Liver of Sulfur solution swirl it around for around 5 seconds. Take it out and it will already be a dusky copper-black. Like the color? It’s done! Want this rose to be as dark as your cold, dark, gothic/emo-kid soul? Dunk and swirl it again for another 5 seconds. Pitch black, like your ex’s heart. Let the rose dry and seal with Polyurethane to prevent further changes to your rose.
Thoughts about the DIY Copper Rose
This project is pretty science-based and was a really fun challenge for my DIY skills. This project was brought to my attention through Fitzi’s father who started making them and was delighted to show me (Thank you